How to Get Allert of Sending Same Email Again
Ship customized e-mail notifications and autoresponders whenever an entry is submitted, updated, or deleted. Automatically send an email to whatever email address and receive a copy of that email after a user submits the form.
Formidable Forms is the best WordPress Grade Architect plugin. Become it for gratuitous!
If you lot're having trouble sending or receiving emails, y'all can find our most mutual solutions to the following:
- Emails not received
- Gmail ignoring the Reply-to address
- Fix electronic mail deliverability outcome with SMTP plugin
- HTML showing in electronic mail
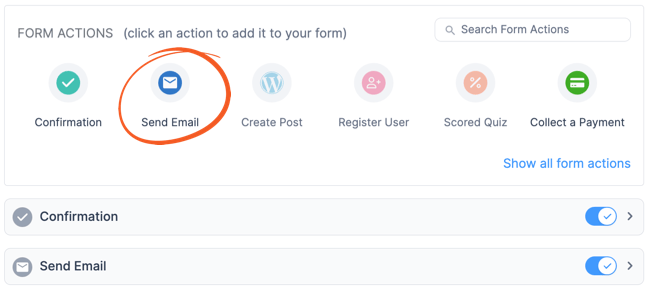
Send email notifications from forms
- Become into your form. Click on Settings → Actions & Notifications. By default, at that place will already be an e-mail notification set upwards. Click on the Send E-mail to edit it or click the Send E-mail icon to add together an additional notification.
- Give your email notification an Action Proper noun for easy reference. This action proper noun will only be seen on the dorsum-end.
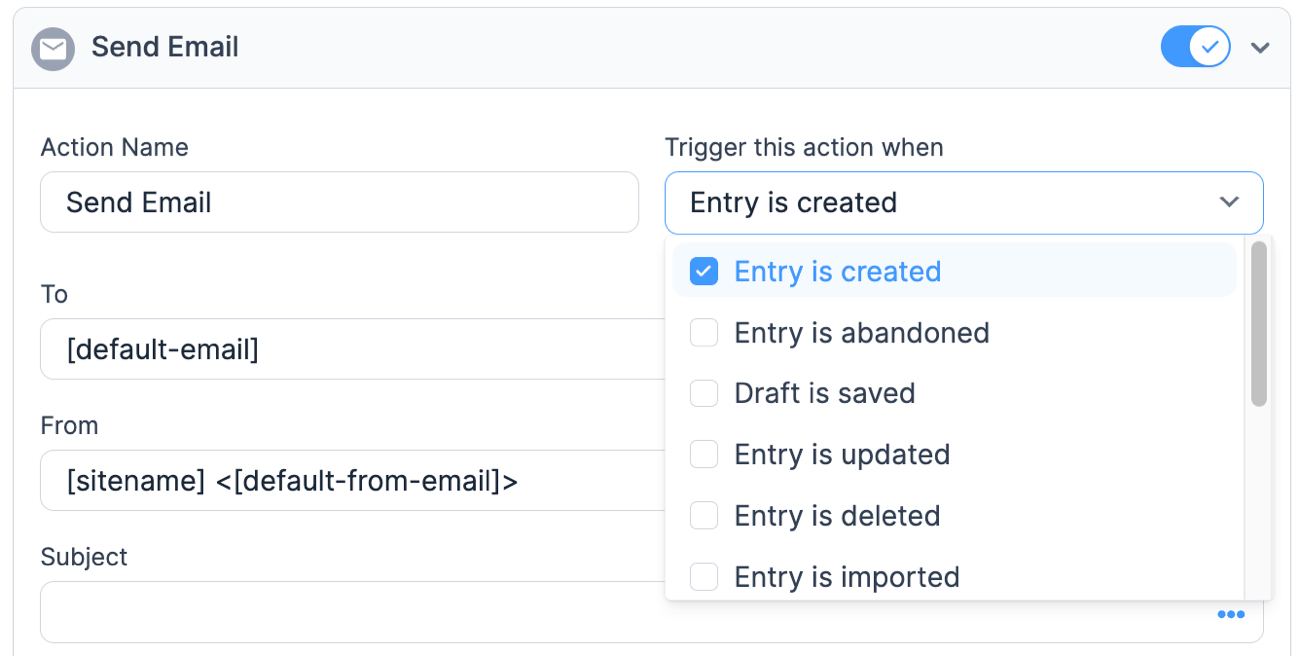
- To configure when the e-mail is sent, select i or more of the post-obit from the Trigger this action when dropdown options: Entry is Created, Draft is Saved, Entry is Updated, Entry is Deleted, or Entry is Imported. If you are running the Lite version, these options will be hidden and the form activity volition be triggered when an entry is created.
- Enter 1 or more email addresses in the To box. By default, the [admin_email] shortcode will be inserted in the To box. This will send the notification to the email address from your WordPress General Settings page.

The only formats that tin be used are name <name@email.com> and proper noun@electronic mail.com. To send the same notification to multiple recipients, carve up them with a comma. - If you would like others to receive a copy of the message, click CC and insert the electronic mail(south) in the CC box that appears. If you would like others to receive a re-create of the bulletin just do non desire them to exist shown to the recipients, click BCC and insert the email(s) in the BCC box that appears.
The only formats that can be used are name <electronic mail@instance.com> and email@example.com. Divide multiple email addresses with a comma. - Insert the sender'southward name and email address in the From box. By default, your website name and admin email address from your WordPress General Settings page will be used.

- If you want to reply to a unlike email address other than the ane the message was sent from, click Respond To, and then enter in the Reply To email address. The formats that can be used are name <email@instance.com> and email@example.com.
Desire to set the Reply to selection to the email address of the sender? Meet how to respond to the visitor
- Add a subject in the Subject box. If not subject is entered, emails will use '[Form proper noun] Course submitted on [Your site name]'.

- By default, the [default-bulletin] shortcode will be inserted in the Bulletin box.
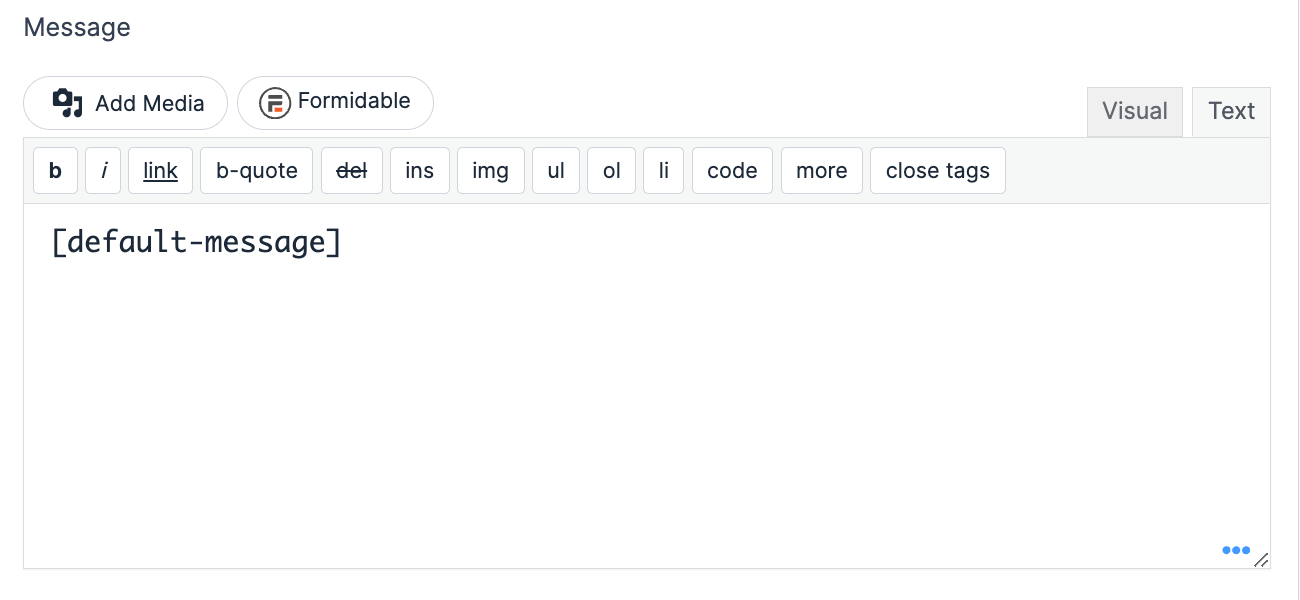
This will display all completed fields in the email notification, which will look similar this:

If you would like to customize the email message, jump to Customize the email message. - (Optional) When the Transport Emails in Plain Text pick is checked, the e-mail volition look exactly how it is in the Bulletin box. Otherwise, you will have to add line breaks with HTML.
After setting up your notification, exam it out by submitting an entry in your form. Email notifications should be sent to all To, CC, and BCC e-mail addresses. If the e-mail notification does not show up in your inbox, please run into this FAQ folio to find a solution.
Reply to the visitor
To maximize the chances of email deliverability, it'southward all-time to employ the same From address on all emails. To employ the proper noun and e-mail address that was submitted in the form, you tin do the following:
- Click the Reply To button in the e-mail form activity.

- In the Respond To field, y'all tin have a format like [5092] <[5093]>. Supplant 5092 with your sender'due south name field ID, and 5093 with your sender's email address field ID.

Gear up upwardly an autoresponder
- Follow steps i and two in the Ready an email notification section.
- If users volition exist logged in when they make full out the form, insert [113 evidence="user_email"] in the To box. Supersede '113' with the ID of the UserID field in your form.
If your users will Not exist logged-in when they submit this form, put [112] in the To box. Replace '112' with the ID of the email address field in your grade. - Follow steps iv-8 in the Prepare an email notification section.
Prepare up multiple email notifications
If you want to send a unlike electronic mail for each recipient, you can create a split Form action for each i. Suppose you want to send a Cheers message to your users and a re-create of the completed grade information to your admin, follow the instructions below to fix it up.
To send the admin a copy of the submitted form user data:
- Add together an e-mail notification form action.
- Set the TO field to ship it to [admin_email].
- Add the [default-message] shortcode in the Message box which will send all the completed fields to the admin.
For the Thank you message sent to the users:
- Add another e-mail notification course action.
- Ready theTO field to the user's electronic mail address field ID/key in your grade. See more than information on how to set up up automated messages to the user email address.
- In the Message box, remove the [default-message] shortcode and replace information technology with your own Give thanks y'all message.
Manage file attachments
To attach uploaded files to your email notifications delight follow the instructions in the documentation for the File Upload field.
If you merely desire to receive an email with the file attachments and not have whatever files stored online, follow the instructions below
- Enable email attachment by selecting Adhere this file to the email notification in your File upload settings.

- Use this code example to automatically delete uploaded files from your site immediately after the entry is created and the email notification is sent.
If you would like to automatically delete files after the entry is deleted or when they are removed/replaced, select Permanently delete sometime files when replaced or when the entry is deleted in your File upload settings.

Add file attachment
— Premium Feature —
If you want to attach a file to your electronic mail notification, follow the instructions below.
- Get to your formSettings → Deportment & Notifications.
- Click on the Email Notification form action to edit it or click the Send Electronic mail icon to add a new notification.
- Curl downward and click the + Add together attachment button.

- Upload your file or cull from existing files in the Media Library. Click the Select button.
- (Optional) Click the Delete icon if yous want to upload a different file or remove information technology. Note that you tin only upload one file at a fourth dimension.

Add CSV zipper
— Premium Feature —
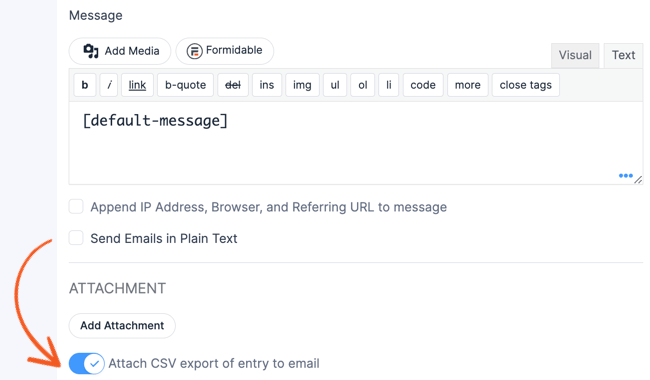
If y'all want to attach a CSV export of the submitted entry to the email notification, follow the instructions below.
-
- Get to your formSettings → Actions & Notifications.
- Click on the Email Notification activity to edit it, or click the Transport Email icon to add a new notification.
- Gyre down and toggle the Adhere CSV consign of entry to email pick.
If you want to set a custom filename for the generated CSV attachment, use the frm_csv_filename hook.
Customize the e-mail message
You have 3 main options for customizing your email notification content.
- Add anything you would similar before or afterward the [default-message] shortcode. The default message includes whatsoever completed fields in the form. If you lot would like to modify the default message, spring to the default bulletin parameters section.
- Customize the default bulletin past selecting 'Default HTML' or 'Default Plain' from the modal options box. This will insert the HTML and shortcodes for the current default message. This code is not dynamic and will not update automatically if fields are added to or removed from your form.

- Remove the [default-message] shortcode and create your ain bulletin from scratch.If you prefer to create your own message from scratch, add your custom content to the 'Message' box. You can add together text, HTML, and inline CSS in this box, simply keep in mind that email clients don't support all types of HTML and CSS. For guidelines to follow when using HTML and CSS to generate emails, click hither. Please note: You will need to add together line breaks with HTML (using <br/> ) unless the 'Send Emails in Plain Text' option is checked.To populate your custom message with fields and information submitted in the form, you can use the insert value box, accessed by clicking the icon in the field. For example, clicking on the 'Commencement Name' field would insert the id of that field, [173], into the bulletin content. The content in the 'Bulletin' box could wait something like this:
The received email would brandish the proper noun that was entered into the course.To add together the title or label of a field to your email message, y'all will need to take this process one step farther. If the ID of your 'Commencement Name' field is 25, you could add the following shortcode to your email message:[25 show="field_label"] : [25]
This would be translated to your field label and the value that was entered, which would wait similar this:
What is your name?: John
Customize the colors
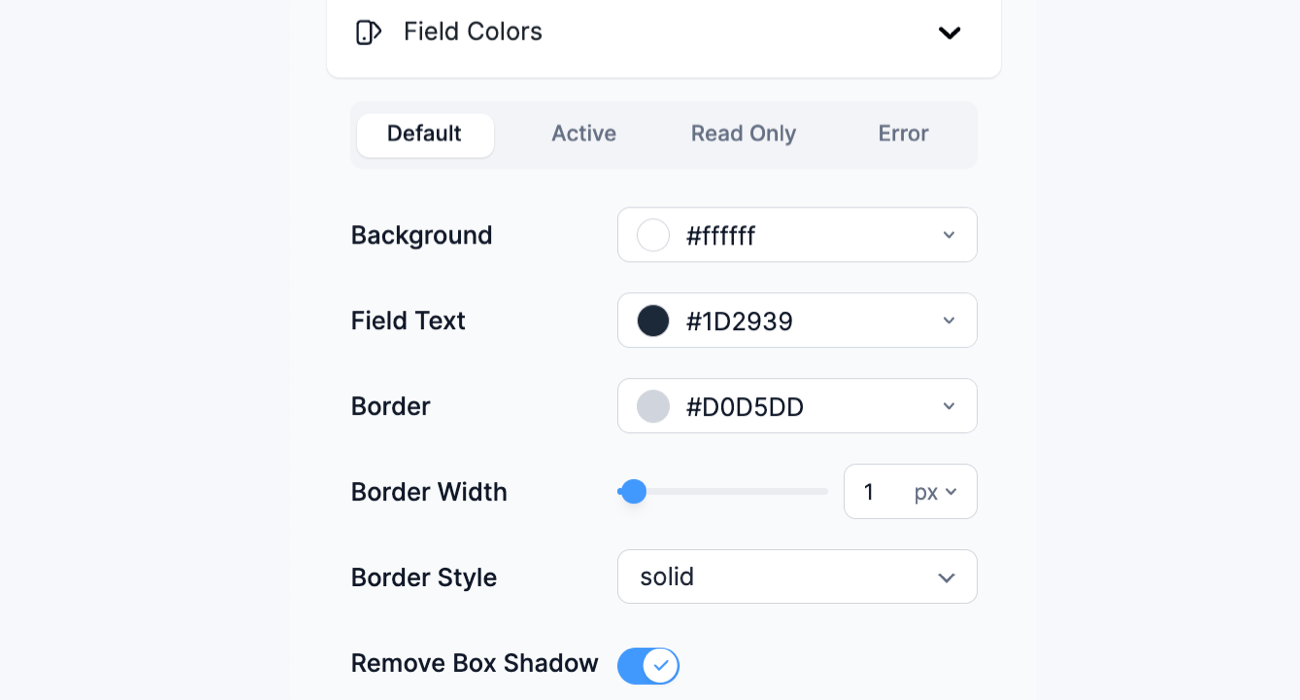
The default email notification gets the border, background, color, and font size from the Formidable → Styles page. Customize the colors in the email notification by changing the following way settings:
- Border color: Styles → Field Colors → Border
- Groundwork colors: Styles → Field Colors → BG Color and Styles → Field Colors → Active → BG Color
- Text colour: Styles → Field Colors → Text
- Border width: Styles → Field Colors → Thickness
- Font size: Styles → Field Settings → Size
Default message parameters
The following parameters can optionally be used to alter the output of the [default-message] shortcode.
- plain_text - By default, the default bulletin displays the content in a tabular array. You can remove the HTML and display just the text by including plain_text=1.
[default-message plain_text="1"]
- user_info - Brandish user data in the default bulletin, including IP accost, browser, and referring URL.
[default-message user_info="ane"]
- include_blank - Include blank fields in the default message.
[default-bulletin include_blank="1"]
- include_extras - Past default, page breaks, headings, and HTML fields aren't included in this shortcode. Yous can include whatsoever/all of them as shown here:
[default-message include_extras="folio, section, html"]
Note: Only the HTML field content is included in this shortcode. Since the form doesn't bear witness the HTML field characterization, it is not included in the email either.
- include_fields - Only include specific fields in the displayed content.
[default-message include_fields="x,15"]
- exclude_fields - Exclude specific fields in the displayed content.
[default-bulletin exclude_fields="10,15"]
- direction - By default the entry is displayed field names in the left column and entries in the right column. Switch those columns by using this shortcode:
[default-message direction=rtl]
- font_size - Determine the size of the font, in pixels.
[default-message font_size="25px"]
- text_color - Determine the color of the text, in hexadecimal form.
[default-message text_color="b642f4"]
- border_width - Make up one's mind the width of the edge in pixels.
[default-message border_width="1px"]
- border_color - Determine the color of the border in hexadecimal course.
[default-message border_color="000000"]
- bg_color - Make up one's mind the color of the background in hexadecimal grade.
[default-message bg_color="ffffff"]
- alt_bg_color - Decide the background color of the alternate rows in hexadecimal class.
[default-message alt_bg_color="eeeeee"]
- format - Specify which format the entry should be returned in. By default, the entry will be returned in a table (format=text). The other options include format=json and format=array. These alternative formats are best to use directly in php instead of using the shortcode on a folio.
- array_separator - Use a unlike separator for multiple checkboxes or dropdown values. By default, this will be a comma separator.
[default-message array_separator="<br/>"]
Add together a logo in bulletin
You can add an epitome or a logo to your email message using the img HTML tag.
- Go to your Electronic mail Notification form action.
- At the location you lot would similar to place the epitome in your email, insert:
<img src="http://instance.com/image.jpg" alt="logo">
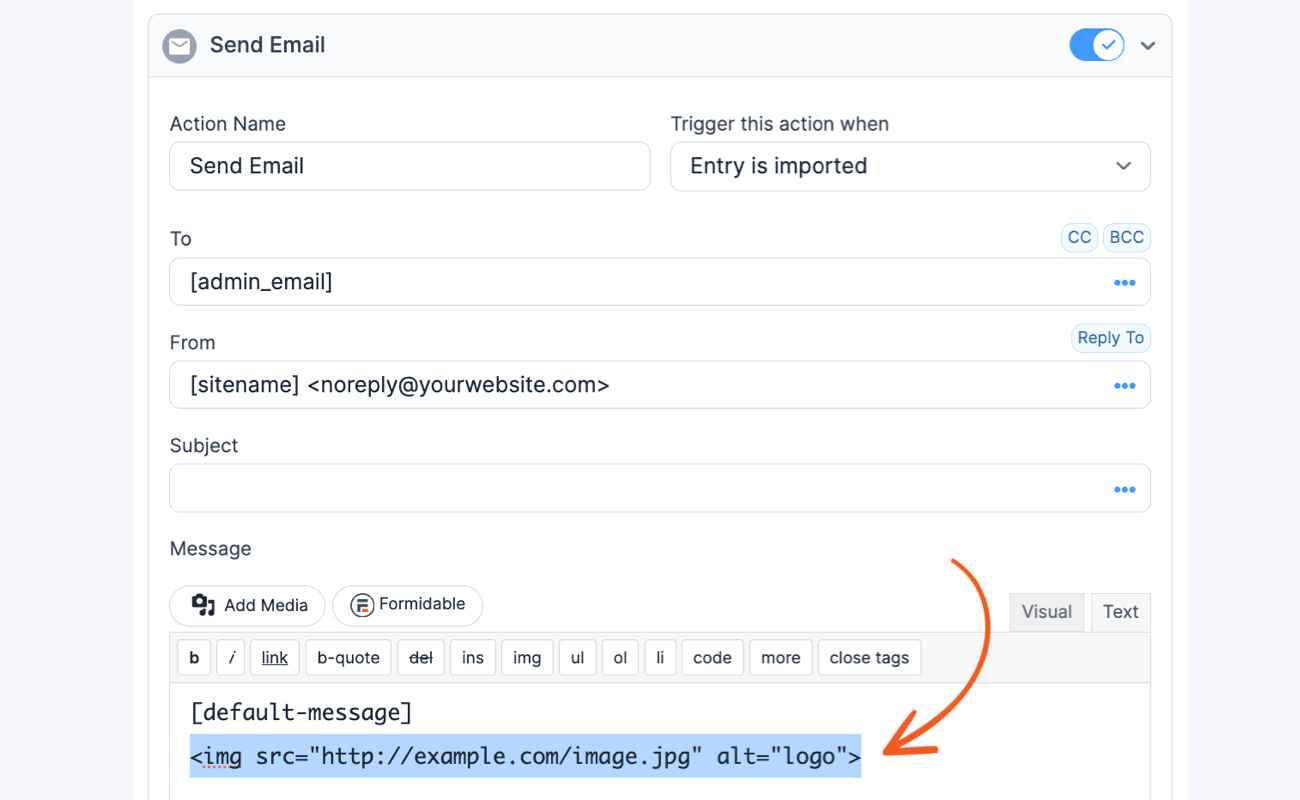
- Change http://case.com/paradigm.jpg to the location of your image and logo to a descriptive alternate text.
If you want to add together a preheader that displays a visible summary in your electronic mail, you tin can add an HTML email code to the Bulletin box. This example volition add together the preheader on the email subject field but hide it on the email message.
<head> <style type="text/css"> span.preheader {brandish: none;} </style> </head> <body><span class="preheader">Get more done in less fourth dimension with better WordPress forms</span></trunk> [default-bulletin] Email routing
— Premium Feature —
There are three ways to route emails, depending on what yous want to accomplish.
- Conditional Logic: Ship a different email to all recipients, using the Provisional logic approach.
- Divide Values: Transport the aforementioned email to all recipients, using the Carve up values arroyo.
- Dynamic Field: Send the same email to all recipients using email addresses that were entered in some other form with the Dynamic field approach.
To further customize email routing, refer to the frm_to_email page for commonly requested custom code examples.
Conditional logic
— Premium Feature —
If you would like to send a different message to each recipient, y'all will need to use Provisional Logic. Suppose you have three departments in your company: human resource, housekeeping, and billing. You also accept a form on your website for people to leave an research. You want to send human resource an e-mail notification regarding the enquiry only if information technology is applicable to them. The same is true for billing and housekeeping.
- Become to build your grade. Add a 'Dropdown', 'Radio', or 'Checkboxes' field called 'Departments'. In this instance, add the options 'Human resources', 'Billing', and 'Housekeeping'. When your users fill up out the form, they will select the department related to their research.
- Become to your form Settings → Actions & Notifications. Click the Send Email icon iii times to add a new notification for each of the three departments.

- Enter the desired recipient email address in the To box and message in the Message box. In this example, information technology would be the email address for human resources:
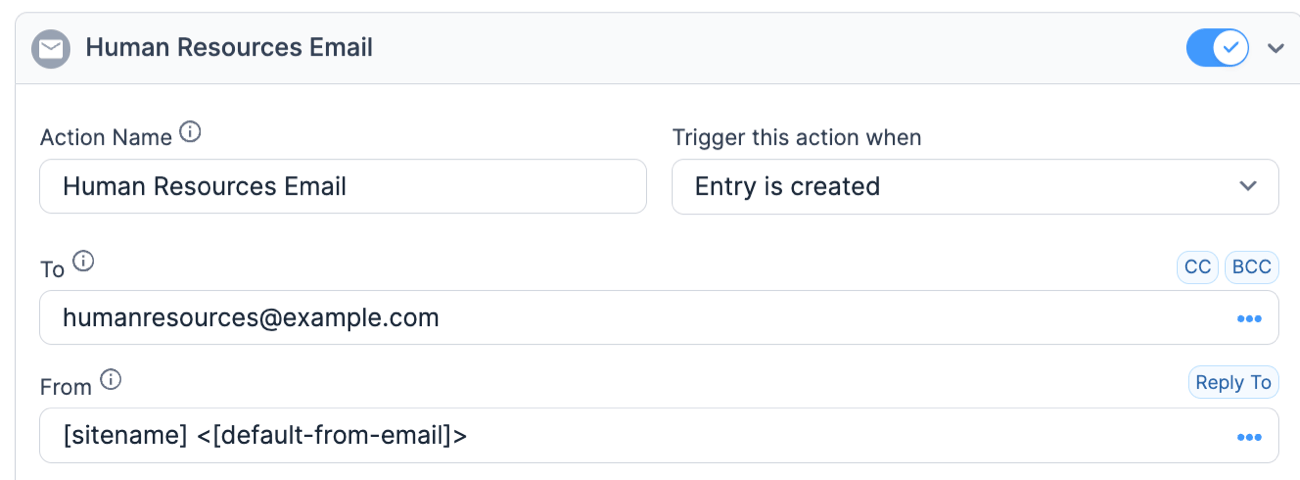
- Select Add Conditional Logic. In this example, set 'Department' is equal to 'Homo Resources':

- At present, human resources will go an email notification simply when the submitted inquiry is relevant to their section and the email content will be unique for each department.
Divide values
— Premium Feature —
If yous would similar to send the aforementioned e-mail notification to all recipients, but the recipient changes based on a field in your form, y'all should utilize Separate Values. Suppose you have 3 departments in your company: human resource, housekeeping, and billing. You too have a form on your website for people to leave an inquiry. Yous want to transport human resource an email notification regarding the enquiry only if it is applicative to them. The same is truthful for billing and housekeeping.
- Add a drib down or radio field to your form. Check the box to 'Utilise separate values' in the field options.
- Add the section for the displayed value and the e-mail address for the saved value.

When your users fill out the form, they will select the section related to their research. - Update your form and go to Settings → Actions & Notifications.
- Add a new notification and click on the icon in the To box. Then click on your dropdown or radio button field in the modal box to add the field to the To box. Add evidence="value" to the field id that was added to your To box.

At present, if the user selects human resource as the department, the email notification will exist sent to human resources.
Dynamic field
— Premium Feature —
If you lot would like to ship the same email notification to all recipients and the recipient should modify based on a field in your form, you can use a Dynamic Field. One advantage of this approach is that there is no way to see the e-mail addresses, fifty-fifty when inspecting the page. Another advantage of this approach is that information technology is dynamically populated using entries from another class.
Suppose you accept three departments in your company: human being resources, housekeeping, and billing. You also have a class on your website for people to leave an inquiry. You desire to send man resource an email notification regarding the inquiry only if it is applicable to them. The same is true for billing and housekeeping.
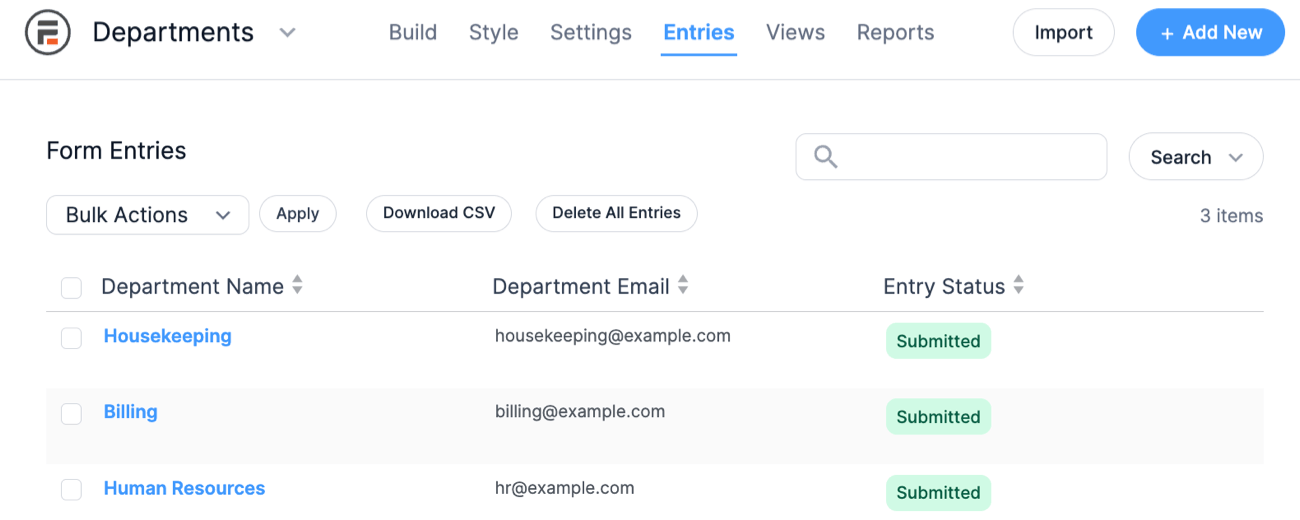
- Create a new class titled 'Departments' for this instance. Add together two fields to this new class: one Single Line Text field for the Section Name, and one E-mail Address field.
- After your class is created, become to the 'Entries' page and add one entry for each option you desire your users to select from. For instance, you may add together entries like this:
- 'Human Resources' in the text field and 'hour@instance.com' in the email field
- 'Billing' in the text field and 'billing@case.com' in the email field
- 'Housekeeping' in the text field and 'housekeeping@example.com' in the email field
- Now, render to the form your users will exist filling out and add a 'Dynamic Field'. Get to Import Options From: and select 'Entries from a course field', 'Departments', and 'Department Name'. Select to display as Dropdown, Radio buttons, or Checkboxes. When your users fill up out the form, they will select the department related to their inquiry.
- Update your grade and go to Settings → Actions & Notifications.
- Add together a new notification and click on the icon in the To box. Then click on the Department Emails field in the modal box to add this field to the list of electronic mail recipients.

Now, if the user selects human resource every bit the section, the email notification will be sent to homo resources.
— Premium Feature —
There may be times when you would like to users to be able to email another user on your site while keeping the To electronic mail accost completely subconscious. If you lot want your users to be able to send a bulletin without ever seeing the email address, follow the directions beneath.
- Create a new form called "Transport a Bulletin". Add a Dynamic field with the post-obit settings:
- Dynamic Default Value: [go param=to_name]
- Load options from: the form where a proper noun/email will be added - Name field
- Display as: dropdown
- Visibility: Administrator (merely you or other administrators will see this. Your users volition not see this field)
- Add any other fields that you would similar to, including a paragraph field for entering a message.
- Go into your Send a Message grade's Settings → Actions & Notifications → E-mail Notification. Insert [x show=y] in the To box. Supplant x with the ID of the Dynamic field in the "Send a Message" course. Supplant y with the ID of the e-mail field in the linked class.
- Publish the "Send a Message" grade on a page.
- If you take not already done so, create a View where users will be able to select an private to email. Add together any data you would like to your View. You must as well add a link which will ship users to the page where your 'Send a Message' form resides. Add a parameter to the end of the link in your View. For example, <a href="siteurl/transport-a-message/?to_name=[id]">Postal service</a>. This will adhere the entry ID to the url. If you would prefer to insert the form within of the View, you can publish it like this: [ formidable id=ten to_name="[id]"].
Electronic mail settings
Label
This is the label or title for the email notification. It will only be seen by the admin on the back-finish.
When to Send Notifications
Electronic mail notifications can be sent by selecting from the trigger options in the Trigger this activity afterwards dropdown. You can further customize when a notification will be sent by using provisional logic.
To
The email address where y'all would like notifications to exist sent. By default, your website name and admin email address from your WordPress Full general Settings page will be used. If you do Not want to receive email notifications, remove '[admin_email]' from this line. To send the same notification to multiple recipients, separate them with a comma.
If you would like the user submitting the form to receive the e-mail notification, select the email address field from the options in the modal box for the To field. If your users will be logged in, you tin insert the User ID field here to send the notification to the email address in their account.
CC
If y'all would similar others to receive a copy of this message, click on 'CC' then insert their email(s) in the box. Multiple emails tin exist used just must be separated with a comma.
BCC
If you would similar others to receive a copy of this bulletin just don't want them to exist shown on any other recipient's copy and so click on 'BCC' and insert their email(southward) in the box. Multiple emails can be used simply must be separated with a comma.
From
The name and email accost the email notification will exist sent from. By default, your website name and admin email address from your WordPress General Settings page will be used. Test the email with your selected From address.
Emails will be much more reliable if you practise not use a user-provided e-mail accost. For case, Yahoo does not allow PHP to ship emails from yahoo.com accounts. In order to assist increment deliverability, Formidable will send the email from wordpress@yoursite.com instead of a Yahoo accost that volition neglect.
Reply To
If you lot would like the user to respond to a different email address other than the i the message was sent from, and then insert it here.
Subject
The subject line for your e-mail notification.
Bulletin
The content of your electronic mail notification. If yous would similar the electronic mail to contain a re-create of the completed form, the easiest selection is to employ the [default-bulletin] shortcode. If you lot would like to modify the default bulletin, bound to the default bulletin parameters section.
Append Browser and Referring URL to message
Append the user IP address, browser information, and referring URL to the email notification. This volition besides include user tracking information if you lot checked the box in the Formidable → Global Settings to 'Track referrer information and pages visited.' The user IP address, browser information, and referring URL is automatically stored when the entry is submitted and is accessible with the entry as well.
Transport Emails in Patently Text
Plain text emails don't back up bold, italic, colored fonts, or other text formatting, but evidently text emails are universally supported by all email clients. HTML can increase the chances of electronic mail existence flagged as spam, and then if you lot are having trouble with spam blockers, try sending the email as evidently text. Also, if yous create a custom message without any HTML, cheque this box so hard returns volition be seen in the email.
Add Conditional Logic
Conditional logic for emails is a premium feature. Send a notification just if certain conditions in your form are met. For pace-by-stride instructions on how to apply provisional logic to route e-mail notifications, jump down to Email Routing.
Resending emails
— Premium Feature —
If you would like to resend an email, follow the steps beneath.
- Go to the Formidable → Entries folio.
- Select "view" or "edit" nether the entry you lot would similar to resend.
- Click the Resend selection in the right sidebar. This will send all email Form Actions that are ready to exist triggered when an entry is created.

- Later on clicking Resend, a list of electronic mail addresses will be displayed. Each of these email accounts should receive an email. If the email is send to "no one", please cheque the conditional logic on the email you are having trouble with.
Trigger emails for registered subscribers
If you would like to trigger emails for already registered subscribers, follow the steps below. Note that this is only intended for pocket-size amounts of emails. Equally an alternative, you could use an electronic mail marketing service like MailPoet.
- Become to your User Registration Form → Entries page, and click the Download CSV button to export your registered subscribers into a CSV file. Remove other columns that y'all don't desire to include except for Name, Username and Electronic mail field.

- Create a new class with the following fields: Name, Username, and Email field.

- Go to form Settings → Full general → Deportment & Notifications page and create an electronic mail notification. Add the content that yous want to be included in the email message.
- In the Electronic mail Notification form action, select the Entry is imported selection from the Trigger this action when dropdown field and salvage update.

- In the Formidable → Import/Export folio, import the registered subscribers that you exported in Step one. An email volition then be sent to each subscriber as part of the importing procedure.
Troubleshooting
Not receiving emails?
In almost cases we discover that emails get out the website correctly, just are sanitized or deleted before delivery past internet spam protection measures. Considering spam protection rules are constantly getting stricter, a form that previously worked can sometimes cease working out of the blue, even if nada has changed on your website.
To cheque if your Formidable emails are actually existence sent, you tin install a logging plugin such as WP Mail Logging.
If the emails are non being sent and doesn't arrive in your inbox, follow the steps on the Frequently Asked Questions page to attempt and solve the problem.
Reply-to accost ignored by Gmail
There are a few different scenarios where the new Gmail interface volition ignore the Reply-to address in the email header.
- If the To address is the same as the From address, Gmail ignores the Reply-to header information. This looks unusual and can trigger spam deletion. To get this working, you volition either demand to change the From address or the To accost in your email form action.
- If the From address is a registered sending account in Gmail, the Reply-to is ignored.
Ensure email deliverability using SMTP
To avoid e-mail messages being marked as spam, configure your site to send all emails using an SMTP server. SMTP sends messages in a fashion that looks more legitimate than the built-in WordPress mail service, and helps your messages pass spam filters.
To brand certain that your email messages are configured properly, here are of import things to check:
- Your FROM accost MUST match the domain of your website. It is often best to setup a dedicated email for this, similar noreply@mydomain.com.
- Your TO address should never match your FROM address. This looks unusual and tin trigger spam deletion.
- If you specify a Reply-TO address, it should never lucifer your TO address.
- While y'all can include multiple addresses in your TO field, information technology is best to utilise the CC and BCC fields for additional recipients.
- Many spam filters are triggered by also many recipients in one email. For large lists (50 or more than recipients), consider a service similar Sendgrid or SendInBlue.
- Minimize the links you include. E-mail messages with lots of links may trigger spam filters.
Email shows HTML
If there is lawmaking showing in your electronic mail, please run across the steps to get rid of HTML in the email.
Using the incorrect From email
There are times when the email you receive comes from a unlike email address than you have included in your email settings. If the email is sent from wordpress@yoursite.com, this means you are trying to send emails from a Yahoo address. See more particular on this consequence in a higher place.
Another possibility is that you lot are using an SMTP plugin. This type of plugin is designed to transport from a single email address configured in the SMTP settings. We recommend that you use the Reply To option to set the e-mail address you would like.
The From electronic mail address may also change if y'all are sending emails through a transactional email service like SendGrid. This is similar to SMTP, where the from email address is not by and large dynamic.
Your host may have disabled the mail() function
There are ii common solutions if you see the error message: The electronic mail could not be sent. Possible reason: your host may have disabled the mail() role.
- Contacting your host and asking for this part to be enabled may be the quickest mode to resolve your issue.
- If your host will not enable this role, using an SMTP plugin allows your website to send emails without it. Please note that SMTP plugins will apply the postal service() function past default when first installed, and you MUST configure your SMTP plugin with your mailserver settings.
Duplicate emails received
If yous have ready an e-mail activeness to trigger afterward multiple events, it may result in duplicate emails. For case, when the email is set to trigger on cosmos, update, and after a successful payment, emails volition be sent every time one of these events is triggered.
To avert indistinguishable emails, unselect the Entry is created and choose only one action trigger like Successful payment.

Seeing on behalf of in email
In that location are times when the email that you receive displays a annotation like:
info=mysite.com@mail service.mysite.com <info=mysite.com@mail.mysite.com>; On behalf of; mysite.com <user@mysite.com>
If you are using Mailgun or another transactional email service, you might see a on behalf of in your email. This means that your From address doesn't friction match the site domain. Meet more detail on this issue higher up.
Source: https://formidableforms.com/knowledgebase/email-notifications/
0 Response to "How to Get Allert of Sending Same Email Again"
إرسال تعليق